Unveiling the Magic of Accelerated Queen Rearing

Welcome to the buzz on accelerated rearing, where we spill the secrets on doubling your mated queens from a single nuc!
Perfect for those wanting a moderate queen production, dealing with limited equipment or bee resources, or facing a short queen rearing/mating season. And guess what? It’s a fabulous fit for those of us who love grafting and handling cells on a weekly basis.
Let’s Dive In
Here’s the lowdown on how it’s done: Pop a newly hatched virgin or a ripe queen cell into a mating nuc. In the first week, the virgin gets all dolled up, preparing for her mating adventure. A week later, add a second, caged, newly hatched virgin or a ripe cell to the same mating nuc. This younger virgin matures inside the cage while the older one roams freely and goes on her mating spree.
Now, these ladies aren’t besties, so a cage is crucial to keep them from duking it out. Otherwise, it would be a royal rumble, and we’d end up with only one queen in the end.
By the end of the second week, the older virgin starts laying eggs. As we roll into the third week, before those little eggs hatch, we cage and whisk away the newly mated, laying queen. Simultaneously, the younger caged virgin gets her moment as she’s released from the cage. And of course, we pop in a fresh caged virgin or ripe queen cell into the nuc.
Gear Up
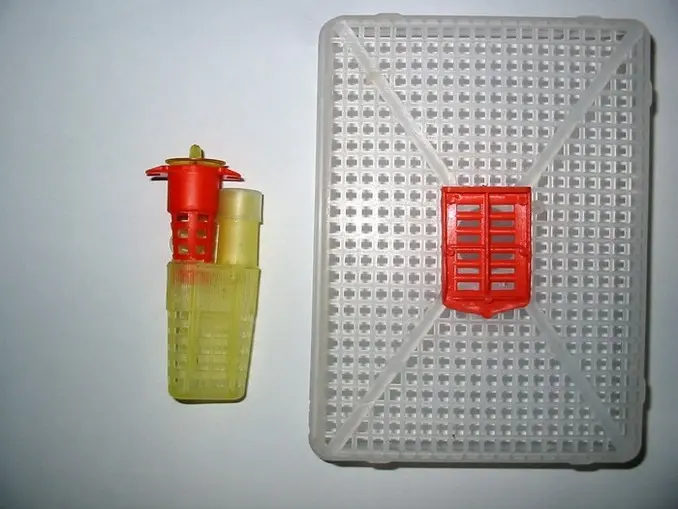
To pull off this queen-rearing magic, you need a top-notch cage for the virgin or ripe queen cell. A Nicot type cage, pressed deeply into the comb’s surface, works like a charm. Personally, I opt for ripe queen cells with Jzbz plastic queen cell cups and protectors. With a bit of reaming, the protector slides into a Jzbz plastic queen cage or a California wooden queen cage.
Pro tip: Skip the wire cage; queens tend to get tangled up in each other’s tarsi around that narrow wire.
Keeping the Queens Happy
Now, queens need their snacks! Liquid honey must be on the menu for the caged virgin queen. If you’re using a Nicot type cage, no sweat—just place the cell or virgin over some open honey. If you’re going the cage route, toss some partially granulated honey into an old plastic queen cup. Slide the cup inside the plastic cage or into the other hole in a wooden cage.
Let’s Talk Schedule

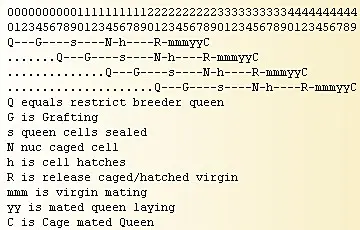
-Accelerated schedule.
Peek at the accelerated queen rearing schedule above. Days are along the top line, grafting cycles read horizontally, and each character represents one day.
Why It Works — A Peek into Bee Biology
Let’s get a bit sciency. After a virgin queen hatches, it takes an additional seven days for her to mature enough to mate. Then, for three days, she’s out there doing her mating dance. Toward the end of her second week, she starts laying eggs.
During this time, most bees treat a week-old virgin queen just like any other young bee. They tolerate and care for multiple virgins. But these feisty ladies won’t stand for queen cells, mated queens, or other virgin queens—they’ll fight until only one survives.
But once a virgin queen mates, the bees become queen protectors, showing hostility to any other queens or cells. It takes three days for bee eggs to hatch. When a mated queen’s first eggs hatch, the bees turn into fierce guardians, defending their new queen at all costs.
In the schedule above, notice how the C, R, and N are aligned vertically under one day. This magical alignment of timings and bee behavior is the key to making accelerated rearing possible.
A Few Downsides
As much as we love accelerated rearing, it comes with a few drawbacks:
- You can’t evaluate a mated queen’s brood pattern before caging her.
- This method isn’t extendable.
- Queens must be harvested on time—no exceptions.
Stick to the schedule; mated queens can’t linger in the nucs for more than an extra day or two without some unfortunate losses.
Food for Thought
Beekeeping can be a breeze with some kinds of bees and a bit challenging with others. When dealing with the tough bees, every beekeeping skill gets put to the test. So, give this method a whirl on a small scale. Some bee types make accelerated rearing a walk in the park, while others might need a bit more convincing.
Fun fact: Russian bees, notorious for hard queen introductions, surprisingly are the easiest for accelerated rearing.
Research has shown that the longer a young queen stays in the nuc, the more reliable and long-lived she becomes. But accelerated rearing isn’t the go-to for queens you plan to cage, ship through the mail, or put through the wringer. It’s a bit rough on our lovely young queens, especially the accelerated ones.
You’ll need larger nucs for accelerated rearing—big enough to handle two queens at once. I personally use five-frame mating nucs, packed with enough bees to care for multiple virgins or keep a cell warm. Depending on your climate or situation, a mini mating nuc might struggle to raise more than a few accelerated cycles.
Nucs working through an extended time need a young, motivated workforce. They perform even better with some open brood around. Occasionally skip a cycle to let a mated queen lay some brood and boost the motivation of the mating nuc. Alternatively, reinforce the mating nuc with brood from a support hive.
Wrapping It Up
I’ve dabbled in maturing more than one caged virgin or ripe queen cell at a time. While the caged virgins had a bustling entourage on the first day, the bees swiftly picked their favorites, leaving the rest to fade away.
Accelerated rearing is like giving the bees a little push. It’s perfect for climates with limited queen rearing weather.
This method, detailed in Steve Tabor’s “Breeding Superbees,” has been my go-to for producing mated queens during Wyoming’s short season.
-Bee-liciously Yours, D 🐝🤠
